Showing posts with label how-to. Show all posts

Friday, September 10, 2010

It's artifactual

The following post is based on a lecture kindly provided by Dr. Rittman.

In previous posts, we discussed how tissue is fixed and processed. During both of these procedures, things can go bad, leading to what we call staining "artifact".

The most common artifacts caused by goofs in fixation have to do with the speed of fixation vs. the thickness of the tissue. If the fixative doesn't get to individual cells fast enough, cell death occurs. Hence, the thicker the tissue the greater the chance of autolysis in the deeper layers of tissue.

Poor fixation is often seen in weak staining of components especially nuclei and a lack of crispness of details. Here's an example of a nice stain of buccal (cheek) mucosa. See how easily we can make out the nuclei and the nuclear structures?

Not so the case with a badly fixed section. Everything is blurry and we can't even see individual cells, let alone nuclear membranes.


Another potentially embarrassing artifact is something we histologists like to call "shrinkage". During processing, soft tissue shrinks an average of 25-30%. This can be very noticeable at hard/soft tissue interfaces: as shown below. See all the white space between the bright pink bone and the more purple bone marrow within? That's a result of shrinkage.

Problems with fixation are often accentuated in tissues such as compact bone where the mineral impedes penetration of the fixative. In such cases the soft tissue may show better preservation than the bone. Below is a nicely fixed section showing bone (the light purple stuff on the bottom). Arrows indicate osteocytes, or bone cells, sitting within their lacunae in the mineralized matrix.


Notice in the poor fixation slide that the lacunae in the bone towards the lower portion of the image are empty. Also, the bone structure itself looks a lot less uniform and “cracked”.


Sometimes, we demineralize bone or tooth to make it easier to section. The tissue is fixed, then the hard mineral is removed by treatment with dilute acid. Demineralization can cause similar effects to poor fixation if the tissue is left for too long a period of time. This can result in nucleic acid degradation with subsequent poor staining. On the other hand, if hard tissue is left for insufficient length of time in the demineralizing solution then there can be areas deep in the hard tissue that still retain mineral. These areas stain a deeper purple with hematoxylin as seen in the following image (this was probably a very difficult section to cut!)


Artifact can also occur during sectioning of the tissue. During sectioning a thin slice is cleaved from the surface of the block. The thinner the section the greater the chance of a sectioning artifact. You can experience this if you take a block of cheddar cheese and cut a slice. It is easy to cut the block of cheese in two, however the thinner the slice that you attempt the greater the chance of the slice fragmenting. Essentially, a tissue section is similar to a block of cheese mounted in a microtome. When the block initially contacts the knife there is a certain amount of vibration. This can result in what are known as “chatter marks” – alternating thick and thin areas in the section parallel to the direction of cut. As you might expect, it is easy to get chatter when sectioning hard tissues such as bone as shown below (direction of cut from the right hand side of the block).
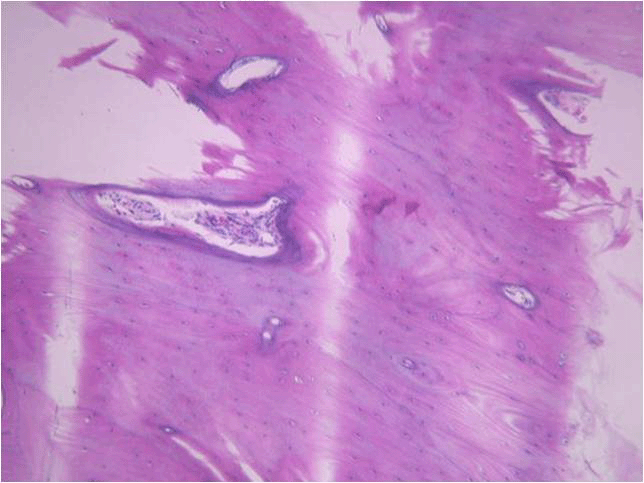

Another way artifact may be created is during section mounting on the slide. We want the section to become completely flattened without any folds or areas that do not completely attach to surface of the slide. If the section does fold or pull away while it is being transferred to the slide, odd-looking structures can occur. Take the example shown in dentin staining of a tooth, below. That dark purple line isn’t a real structure, it’s just a fold in the section that picks up the purple hematoxylin stain. Sometimes folds in soft tissue can even be mistaken for structures such as blood vessels


Finally, areas raised from the slide surface may allow the stain to penetrate the section from both sides of the section and cause uneven staining. Here’s an example of this in a tooth section. The dark pink areas are places in the section that have lifted away from the slide surface and become stained by eosin on both sides of the tissue.


As you can see, there are many, many ways to goof up preparing and sectioning a histology slide. This may also explain why some of your sample slides are less than perfect. This definitely explains why your instructors get upset when good sample slides are broken. It takes time, practice, and talent to section and stain well!

Monday, August 9, 2010

It's the small things that matter

Today's topic is presented by Dr. Angel Paredes, also of the Department of Pathology and Laboratory Medicine.

For those dental students reading along, in class yesterday, Dr. Bick discussed transmission electron microscopy (TEM). Cell structures can be imaged using this technique to obtain magnifications of up to the maximum of 25,000,000X in some microscopes. Of course with this kind of power, these magnifications would be like looking at an elephant with a light microscope and that wouldn't make very much sense. Typically magnifications in the range of 2000x to 40,000x are useful for examining things like cells (eukaryotic and prokaryotic), viruses and protein complexes.

For tissue structure, specimens are stained with heavy metals (osmium tetroxide for lipids, Uranyl Acetate for proteins and lipids) and embedded in a resin. The resin is then sectioned thinly and mounted on a metal grid which is then stained again with Uranyl acetate and lead citrate. The grid is placed in the microscope where electrons are passed through the sample where the heavy metal stains interact with the beam giving the image its characteristic contrast.

The way this happens is that electrons hit a structure and change course (because of the heavy metal), some pass through with minimal interference (no heavy metal or just a little). A charged coupled device (CCD or digital camera) camera records the image by measuring the electron density at each pixel, thus creating a black and white EM image like we see in class. Electrons do not have color so images are black and white.

Since samples need to be sectioned for this technique, this doesn't really tell us much about the 3D structure of cells. For that analysis, we need to use a scanning electron microscope. Cells are coated with a very gold palladium in a sputter coater, and the electron beam is bounced off the surface. The resulting image shows only the cell surface.

Recently, however, advances in computing have allowed scientists to further develop electron cryomicroscopy, or cryoEM. This is a technique that is used to image very small biological specimens (< 1 micron) frozen and perfectly preserved in amorphous ice. NOT resin! Why is that important? The specimen that is imaged is perfectly preserved and, in the case of virus, the virus can later be removed from the microscope, thawed from the ice, and used to infect more cells - illustrating that the images recorded were indeed of infectious virus.

The process begins by applying 3-4 microliters of specimen (let's just say we're looking at a virus in this example) in buffer onto a 3 mm copper EM grid coated with a net-like layer of carbon holes. The virus is blotted with filter paper creating a thin layer of buffer in which the specimen is briefly suspended. The EM grid is then quickly plunged into a liquid ethane cup at liquid nitrogen temperature where the virus is flash frozen so quickly ice crystals cannot form and the specimen becomes embedded in a layer of glass-like ice. The virus is then placed into an electron microscope specifically designed to image these frozen specimens. Remember, this is TEM, so electrons are passing through the sample. We get a black and white picture that looks something like this:

These are alphaherpesvirus particles!

For the next step, it is important to understand that for homogenous particles such as viruses, all the particles embedded in the ice are in all possible orientations and can be considered different views of the same object. Using a computer, the digitized images from the microscope and image analysis software, the orientation of each particle is determined relative to the electron beam. Once all the orientations are determined, the computer merges all the different views into one 3D model which then represents the specimen. Because the specimen is reproduced in 3 dimensions, it can be dissected and studied by imaging software. Behold the modeled structure of Sindbis virus (an alphaherpesvirus):


A few words about resolution, from the expert:
"Ok. You would have to ask about resolution. Resolution in the world we live in means essentially the minimum distance that two small elements in an image (dots) are distinguishable as two independent elements or dots.
(Also remember from Dr. Bick's lecture that the distance (d) between points that can be resolved increases as the wavelength of light increases, i.e. the resolving power goes down.)

In cryoEM you relate everything to your pixel size and image size. The pixel is a measurement of a grey value of the specimen you scanned. The pixel size is dependent on the mag. The higher the mag, the smaller the pixel size when you image it with the digital camera on the microscope.

Ok, now you have pixel size and image size. Say you have a pixel size that is 2 angstroms/pixel. This means that the absolute best resolution you can get is 4 angstroms resolution because you cannot achieve a resolution that is equal to your scanning step size or pixel. The best you can do is twice the pixel size.

So, what does resolution mean? In cryoEM resolution is quantifiable. You have an image. The image has noise and you refine the data to achieve the best resolution and that is when the noise and signal equal each other and the ration is 1. You cannot get better than that. With the image and pixel size you know exactly at what resolution this occurs. For my newest virus image, I get to 13 ansgtroms resolution. That does not mean that I can see two dots no closer than 13 angstroms. In fact I can see detail that is smaller than 13 angstroms. The resolution in this case is a quantifiable measure of how far out I can signal from the data in terms of resolution with the maximum being 2 times the pixel size.

I know it's complicated but YOU ASKED."

Thursday, October 8, 2009

It's Auerbach's plexus

(answer for the Friday what is it)

Here is an H&E stained version of an Auerbach's, or myenteric plexus. Remember that this structure is part of the intrinsic component of the innervation of the intestines. The Auerbach's plexus contains sensory neurons that receive information from nerve endings in the smooth muscle layer regarding the composition of the intestinal content (chemoreceptors) and the degree of expansion of the intestinal wall (mechanoreceptors). Together with the Meissner's plexus found in the submucosa, the Auerbach's plexus is responsible for intestinal contractions.


This bundle of nerves was first described by Leopold Auerbach, a German anatomist, neuropathologist, and histologist. His work was some of the first to define the nervous system via histological staining.

Friday, October 2, 2009

Tissue fixation and processing

Our previous description of tissue cutting and slide preparation dealt with fresh, snap-frozen tissue. In this installment, we'll describe the more common formaldehyde tissue fixation and processing into paraffin. Dr. Rittman has kindly provided us with an excellent summary of the process:

Remember, the function of fixation is to preserve tissue in as lifelike manner as possible for histological examination.

As soon as tissue is removed from the body, pH within cells falls and lysosomal enzymes are released. Tissue rapidly starts to break down in process known as autolysis. In order to examine tissue histologically the process of autolysis need to be stopped as soon as possible after tissue removal. Failure to do so will allow autolysis to progress and will also cause diffusion of substances from their original locations.

There are a variety of methods for fixing tissue but the most common is chemical fixation by immersing pieces of tissue in a chemical solution.There are several thousand fixing solutions (due to the fact that no one fixing solution is ideal for all applications.) Fixation is most often acheived by cross linking the amino acid groups. Therefore, the most commonly used fixative is a buffered formaldehyde solution.

Fixation is generally accomplished by immersion of thin pieces (less than 5 mm thick) in the fixative for various periods of time, typically 24 hours.

At this point, the histologist has a lump of tissue in formaldehyde. That's not going to be very useful for cutting. In order to be able to cut sections thin enough for microscopic examination, tissue must be embedded in a medium (such as paraffin wax) hard enough when solid for such sections to be cut.

Processing requires:
1. The removal of water by use of a dehydrating agent such as graded ethanols from 70% up to 100% ethanol.
2. The use of an intermediary agent that is miscible with both alcohol and paraffin wax. This commonly xylene, a purified form of petroleum. This stage is also called "clearing" as the tissue becomes translucent during this step.
3. Infiltration with molten paraffin wax. This is normally at 58 to 60 degrees Centigrade and results in gradual removal of the xylene and infiltration of paraffin wax into the tissue. The paraffin penetrates into tissue components and even into the cytoplasm of individual cells.
4. Solidification of the tissue in a block of wax. The tissue is oriented for sectioning by placing in a mold and the paraffin wax allowed to solidify.


During fixation and processing most lipids are extracted (this is why adipose tissue looks like chicken wire). Some non proteinaceous substances will be lost in the fixing solution or during the subsequent process. Other substances such as glycogen may be retained as they are associated with proteins. In addition, due to the solvent action and to heat the tissue undergoes a certain amount of shrinkage. With soft tissues the shrinkage is generally in the order of 25 to 30%. Shrinkage often results in separation of components from each other such as separation of muscle fibers and separation of soft from hard tissue at interfaces. By now, you should be noticing this a lot in your example slides in lab!

Here's an example of shrinkage - the keratin layer in this high-power view of skin is separating from the underlying epidermal layers and from itself. The white spaces indicated by the arrows are artifact and not there in real life.


Sectioning of a paraffin-embedded tissue is very similar to frozen tissue sectioning. The solidified block of paraffin wax is fixed in a holder on the chuck on a microtome. The microtome allows a reproducible forward advancement of the block towards the knife that will slice a section from the surface of the block. Typical advancement is in the order of 5 to 10 microns.


As sections are cut, the lower edge of the block melts slightly allowing this edge to join with the trailing edge of the previous section thus forming a ribbon of sections. Such ribbons of sections as seen here may be stored for a short period of time.


During the sectioning a certain amount of compression occurs so that sections have the same width but are smaller from their upper to lower edges than the paraffin block from which they were cut.

Section mounting.
Sections are floated onto the surface of a warm water bath (usually 45 to 48 degrees F) where the paraffin section containing the tissue expands.
Sections are then collected and oriented on a glass slide and then allowed to dry.

Staining - it's business time!
Remember, most tissue components are of similar refractive indices and cannot be distinguished from each other unless we use phase contrast microscopy. The better way to differentiate tissue components is by the use of histological stains or histochemistry.

Most stains rely on binding to different components by virtue of some type of chemical bonding. We will deal with hematoxylin and eosin although the same general principals apply to many stains.

Sections on slides must first have the paraffin wax removed by soaking in xylene, followed by graded alcohols from 100% to 70% and finally into distilled water. Shown below are slides in the process of moving through the de-paraffinization process.


Sections are then stained in a solution of hematoxylin where the hematoxylin binds to acidic components. Next, we soak the sections in eosin which binds to basic components. The sections are then dehydrated, cleared in xylene and mounted in a transparent mounting medium. If done correctly, the stained and mounted slides will last for decades (as clearly demonstrated by your lab slide sets).

In a final well-stained preparation, nuclei are blue, and the cytoplasm stains a pale pink, (the cytoplasm of some cells may also be blue due to the presence of acidic components such as RER). Muscle cells stain bright pink, red blood cells bright red. Any traces of mineral will appear dark purple. This is especially noticeable in the partially mineralized enamel of developing tissue.

Decalcification (demineralization).
Embryos (while they do contain some mineral in developing teeth and bone)may be sectioned without removal of the mineral. However, tissues with considerable amounts of mineral such as bone, dentin and cementum must first have the mineral removed before paraffin wax sections can be prepared. This process is known as decalcification or more correctly as demineralization.

The tissue is first adequately fixed and then mineral is removed most often using dilute acids. During this process the tissue may show some changes due to the effects of the acid on components other than the mineral. Further hematoxylin-eosin staining then looks like this:


Bright pink staining of a tissue with very few cells is usually bone.

Wednesday, September 9, 2009

How do you get tissue onto a slide, anyway?

As instructors in the laboratory, we sometimes find ourselves telling students, "well, that's just a bad section." Or, "that's staining artifact". But what does that mean, exactly? And how does it happen?

First, you have to understand how sections are processed and placed onto slides. There are two basic ways histologists do this: paraffin and frozen sections. Pretty much all of the slides in the student lab boxes were prepared from paraffin sections. It works like this: a bit of tissue is dropped into a preservative, usually formalin, then it is embedded into paraffin (a wax-like substance). The paraffin block is then placed into a microtome, and very thin sections are cut from the tissue.


Another way to prepare tissue for cutting is by freezing. Frozen sections are the method of choice for most immunohistochemistry and immunofluorescent applications, since the cross-linking of surface antigens by formalin fixation can cause trouble with specific antigen binding by antibodies. Instead, the tissue is isolated and placed directly into a tray containing a special glycerol based compound called O.C.T. (optimum cutting temperature) compound.

Once the tissue is immersed in the O.C.T., it's quick frozen, usually on dry ice, or in an ice/isopropanol slurry. Quick freezing is the key - freeze too slowly and you'll get all kinds of tissue damage and distortion. You don't want bubbles in your O.C.T. either, that will also mess up the architecture of the tissue and make the block very difficult to cut. Obviously, the freezing compound is a big component of the success as well - if we froze the tissue directly, we'd end up with ice crystals all over and inside our tissue - again pretty much destroying the cellular structures.

OK, so, once you've got your tissue frozen, you get a little block that looks like this:

This example is rat abdominal muscle, in case you were wondering.

The next step is to mount the block onto a tissue chuck. This is the holder that will be placed into the microtome. The histologist will remove the plastic backing, then use some more OCT to stick the block to the chuck (this step is usually performed on a block of dry ice - it has to freeze on there). It's important not to get any bubbles in the O.C.T. - this results in the dreaded "chatter" when you cut the tissue, leading to uneven sections. Trim the block a bit, and you're ready to move to the microtome. Shown below is a cryotome, or cryostat - since we're cutting frozen sections, we need to keep everything cold, hence, there's a refrigeration unit surrounding the microtome. If this was a paraffin section, the microtome wouldn't need all that infrastructure. That can cut at room temp.

Next we have a closer shot of the innards of the cryotome. Our friendly neighborhood histologist, Brian Poindexter from Dr. Roger Bick's lab, is holding the tissue chuck with the muscle sample mounted to it. The square structure behind his hand is the microtome itself, and the chuck will be placed into that black holder in the center.

The chuck (+ block of tissue) is placed into the holder, adjusted so that the block is parallel to the knife blade and now the process of cutting really begins. That black part of the microtome you see there? That's controlled by a handle - every turn of the handle inches the microtome closer to the knife by a pre-set distance (this is adjusted on the machine). Imagine the butcher at the deli thin-slicing meat, and you have the idea. First, the histologist slices away the extra O.C.T. from the tissue, and once he reaches the tissue itself he starts to make really thin slices. Below, you can see the muscle tissue clearly, and there is a section in the process of being cut.


The section will peel off of the main block like onion skin. This one is just starting to separate. You should be able to make out the (very sharp) knife blade at the block. Incidentally, this blogger had a very nasty experience in grad school involving a cryotome knife that resulted in a lot of blood all over the cryotome and 5 stitches in her fingertip. Not recommended.

The microtome operator continues to slice the section free in a smooth motion, and should wind up with something like this:


Most sections are cut at 5 - 10 MICROmeters, so you don't want to sneeze while you're in the process of slicing! (Also something your blogger has done whilst in grad school). An unstable block, or unstable speed of cutting can lead to thick/thin portions on a section, or tearing of the tissue before it peels off all the way.

Now it's time to get the tissue onto the slide. This is probably the point in the procedure where bad things are most likely to happen. The histologist uses a brush to gently coax the thin tissue + O.C.T. onto a slide, like so:

If you're not careful, you can double up the section on the slide, or get a big wrinkle in it, or tear it. Ever wonder why some example slides have tissue that looks like it's been folded in parts? This is usually the cause. You can also "stretch out" the tissue, pulling it apart and spreading it out on the slide, again leading to a lot of artifact and distortion.

Finally, the histologist moves the slide out of the cold of the cryotome into room temperature air, the O.C.T. melts, and voila! Tissue sections on a slide!


Obviously, some more prep has to go into getting the sections ready to stain, but we'll leave that for another post.

Big thanks to Brian Poindexter, M.S., with the Imaging Core Lab, Department of Pathology and Laboratory Medicine.