Here's something to put our lives on Earth into perspective. Also, a wonderful illustration of the power of statistics done right.
Monday, January 3, 2011
It's a spleen
(sorry for the extremely late update)
Specifically, this is the red pulp of the spleen. Below is a lower power view of the red pulp with white pulp in the upper left. Remember, in an H & E section, white pulp stains dark purple. This is due to the presence of WHITE blood cells (mainly lymphocytes) that surround the central arterioles. Many students think that "white" pulp means the lighter staining part of the spleen. Don't make that mistake. Red pulp often looks "lighter" due to the presence of the splenic sinuses (white spaces), but red pulp also usually has brownish staining (lipofuscin) cells as well as red blood cells present.

The lipofuscin is found within the splenic macrophages that are responsible for taking up and destroying worn-out red blood cells.
Friday, November 5, 2010
Friday "What is it?"
Here's a nice high power view of the tissue. This one should be pretty easy (note all the lipofuscin that is present)


Wednesday, October 6, 2010
It's a salivary gland
Specifically, human submandibular gland (located beneath the floor of the mouth). A salivary gland is a large compound acinar gland, which means that the secretory cells in the gland are arranged in globular units. These acini secrete their contents into ducts, which get progressively larger as they carry contents from the acini through the secretory portion of the gland, eventually combining in between the lobules of the gland and secreting through one big duct into the mouth. In the picture below, I have labeled an intercalated duct and large interlobular duct. Remember that the lumen of the interlobular duct is a good place to observe stratified columnar epithelium.
The submandibular gland is considered to be a "mixed" secretory gland, that is, it contains serous and mucous acini. I have labeled a purple-staining serous acinus in the picture. There aren't any mucous secreting cells in this frame, but they are in the tissue somewhere. This gland produces saliva (from the mucous acini) and salivary enzymes like amylase (from the serous acini).

Salivary glands are also good places to observe blood vessels, adipose tissue, and light pink connective tissue. In this picture, you can also see infiltrating lymphocytes (the little purple cells) indicating that some sort of immune response was occurring.
Friday, October 1, 2010

Friday, September 10, 2010
It's artifactual
The following post is based on a lecture kindly provided by Dr. Rittman.
In previous posts, we discussed how tissue is fixed and processed. During both of these procedures, things can go bad, leading to what we call staining "artifact".
The most common artifacts caused by goofs in fixation have to do with the speed of fixation vs. the thickness of the tissue. If the fixative doesn't get to individual cells fast enough, cell death occurs. Hence, the thicker the tissue the greater the chance of autolysis in the deeper layers of tissue.
Poor fixation is often seen in weak staining of components especially nuclei and a lack of crispness of details. Here's an example of a nice stain of buccal (cheek) mucosa. See how easily we can make out the nuclei and the nuclear structures?

Not so the case with a badly fixed section. Everything is blurry and we can't even see individual cells, let alone nuclear membranes.

Another potentially embarrassing artifact is something we histologists like to call "shrinkage". During processing, soft tissue shrinks an average of 25-30%. This can be very noticeable at hard/soft tissue interfaces: as shown below. See all the white space between the bright pink bone and the more purple bone marrow within? That's a result of shrinkage.

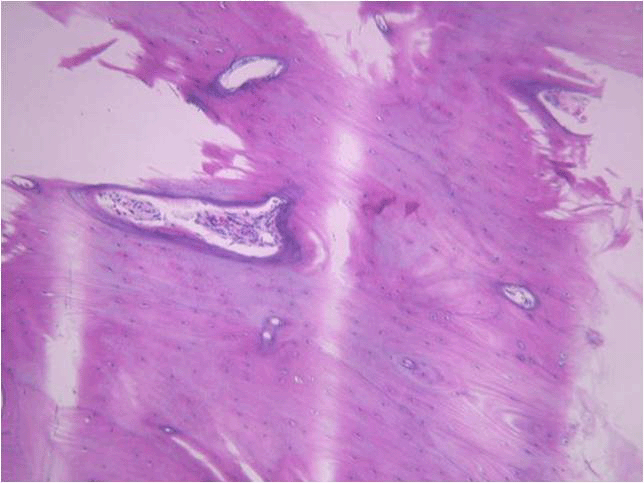
Problems with fixation are often accentuated in tissues such as compact bone where the mineral impedes penetration of the fixative. In such cases the soft tissue may show better preservation than the bone. Below is a nicely fixed section showing bone (the light purple stuff on the bottom). Arrows indicate osteocytes, or bone cells, sitting within their lacunae in the mineralized matrix.

Notice in the poor fixation slide that the lacunae in the bone towards the lower portion of the image are empty. Also, the bone structure itself looks a lot less uniform and “cracked”.

Sometimes, we demineralize bone or tooth to make it easier to section. The tissue is fixed, then the hard mineral is removed by treatment with dilute acid. Demineralization can cause similar effects to poor fixation if the tissue is left for too long a period of time. This can result in nucleic acid degradation with subsequent poor staining. On the other hand, if hard tissue is left for insufficient length of time in the demineralizing solution then there can be areas deep in the hard tissue that still retain mineral. These areas stain a deeper purple with hematoxylin as seen in the following image (this was probably a very difficult section to cut!)

Artifact can also occur during sectioning of the tissue. During sectioning a thin slice is cleaved from the surface of the block. The thinner the section the greater the chance of a sectioning artifact. You can experience this if you take a block of cheddar cheese and cut a slice. It is easy to cut the block of cheese in two, however the thinner the slice that you attempt the greater the chance of the slice fragmenting. Essentially, a tissue section is similar to a block of cheese mounted in a microtome. When the block initially contacts the knife there is a certain amount of vibration. This can result in what are known as “chatter marks” – alternating thick and thin areas in the section parallel to the direction of cut. As you might expect, it is easy to get chatter when sectioning hard tissues such as bone as shown below (direction of cut from the right hand side of the block).

Another way artifact may be created is during section mounting on the slide. We want the section to become completely flattened without any folds or areas that do not completely attach to surface of the slide. If the section does fold or pull away while it is being transferred to the slide, odd-looking structures can occur. Take the example shown in dentin staining of a tooth, below. That dark purple line isn’t a real structure, it’s just a fold in the section that picks up the purple hematoxylin stain. Sometimes folds in soft tissue can even be mistaken for structures such as blood vessels

Finally, areas raised from the slide surface may allow the stain to penetrate the section from both sides of the section and cause uneven staining. Here’s an example of this in a tooth section. The dark pink areas are places in the section that have lifted away from the slide surface and become stained by eosin on both sides of the tissue.

As you can see, there are many, many ways to goof up preparing and sectioning a histology slide. This may also explain why some of your sample slides are less than perfect. This definitely explains why your instructors get upset when good sample slides are broken. It takes time, practice, and talent to section and stain well!
In previous posts, we discussed how tissue is fixed and processed. During both of these procedures, things can go bad, leading to what we call staining "artifact".
The most common artifacts caused by goofs in fixation have to do with the speed of fixation vs. the thickness of the tissue. If the fixative doesn't get to individual cells fast enough, cell death occurs. Hence, the thicker the tissue the greater the chance of autolysis in the deeper layers of tissue.
Poor fixation is often seen in weak staining of components especially nuclei and a lack of crispness of details. Here's an example of a nice stain of buccal (cheek) mucosa. See how easily we can make out the nuclei and the nuclear structures?

Not so the case with a badly fixed section. Everything is blurry and we can't even see individual cells, let alone nuclear membranes.

Another potentially embarrassing artifact is something we histologists like to call "shrinkage". During processing, soft tissue shrinks an average of 25-30%. This can be very noticeable at hard/soft tissue interfaces: as shown below. See all the white space between the bright pink bone and the more purple bone marrow within? That's a result of shrinkage.

Problems with fixation are often accentuated in tissues such as compact bone where the mineral impedes penetration of the fixative. In such cases the soft tissue may show better preservation than the bone. Below is a nicely fixed section showing bone (the light purple stuff on the bottom). Arrows indicate osteocytes, or bone cells, sitting within their lacunae in the mineralized matrix.

Notice in the poor fixation slide that the lacunae in the bone towards the lower portion of the image are empty. Also, the bone structure itself looks a lot less uniform and “cracked”.

Sometimes, we demineralize bone or tooth to make it easier to section. The tissue is fixed, then the hard mineral is removed by treatment with dilute acid. Demineralization can cause similar effects to poor fixation if the tissue is left for too long a period of time. This can result in nucleic acid degradation with subsequent poor staining. On the other hand, if hard tissue is left for insufficient length of time in the demineralizing solution then there can be areas deep in the hard tissue that still retain mineral. These areas stain a deeper purple with hematoxylin as seen in the following image (this was probably a very difficult section to cut!)

Artifact can also occur during sectioning of the tissue. During sectioning a thin slice is cleaved from the surface of the block. The thinner the section the greater the chance of a sectioning artifact. You can experience this if you take a block of cheddar cheese and cut a slice. It is easy to cut the block of cheese in two, however the thinner the slice that you attempt the greater the chance of the slice fragmenting. Essentially, a tissue section is similar to a block of cheese mounted in a microtome. When the block initially contacts the knife there is a certain amount of vibration. This can result in what are known as “chatter marks” – alternating thick and thin areas in the section parallel to the direction of cut. As you might expect, it is easy to get chatter when sectioning hard tissues such as bone as shown below (direction of cut from the right hand side of the block).
Another way artifact may be created is during section mounting on the slide. We want the section to become completely flattened without any folds or areas that do not completely attach to surface of the slide. If the section does fold or pull away while it is being transferred to the slide, odd-looking structures can occur. Take the example shown in dentin staining of a tooth, below. That dark purple line isn’t a real structure, it’s just a fold in the section that picks up the purple hematoxylin stain. Sometimes folds in soft tissue can even be mistaken for structures such as blood vessels

Finally, areas raised from the slide surface may allow the stain to penetrate the section from both sides of the section and cause uneven staining. Here’s an example of this in a tooth section. The dark pink areas are places in the section that have lifted away from the slide surface and become stained by eosin on both sides of the tissue.

As you can see, there are many, many ways to goof up preparing and sectioning a histology slide. This may also explain why some of your sample slides are less than perfect. This definitely explains why your instructors get upset when good sample slides are broken. It takes time, practice, and talent to section and stain well!
Tuesday, August 17, 2010
Maybe we'll see this at the next summer Olympics?
I'd give it a 10.
Extra awesomeness points for the use of pool noodles as mitotic spindles.
Discover Simple, Private Sharing at Drop.io
Extra awesomeness points for the use of pool noodles as mitotic spindles.
Subscribe to:
Posts (Atom)