
Friday, November 5, 2010
Friday "What is it?"
Here's a nice high power view of the tissue. This one should be pretty easy (note all the lipofuscin that is present)

Wednesday, October 6, 2010
It's a salivary gland
Specifically, human submandibular gland (located beneath the floor of the mouth). A salivary gland is a large compound acinar gland, which means that the secretory cells in the gland are arranged in globular units. These acini secrete their contents into ducts, which get progressively larger as they carry contents from the acini through the secretory portion of the gland, eventually combining in between the lobules of the gland and secreting through one big duct into the mouth. In the picture below, I have labeled an intercalated duct and large interlobular duct. Remember that the lumen of the interlobular duct is a good place to observe stratified columnar epithelium.
The submandibular gland is considered to be a "mixed" secretory gland, that is, it contains serous and mucous acini. I have labeled a purple-staining serous acinus in the picture. There aren't any mucous secreting cells in this frame, but they are in the tissue somewhere. This gland produces saliva (from the mucous acini) and salivary enzymes like amylase (from the serous acini).

Salivary glands are also good places to observe blood vessels, adipose tissue, and light pink connective tissue. In this picture, you can also see infiltrating lymphocytes (the little purple cells) indicating that some sort of immune response was occurring.
Friday, October 1, 2010

Friday, September 10, 2010
It's artifactual
The following post is based on a lecture kindly provided by Dr. Rittman.
In previous posts, we discussed how tissue is fixed and processed. During both of these procedures, things can go bad, leading to what we call staining "artifact".
The most common artifacts caused by goofs in fixation have to do with the speed of fixation vs. the thickness of the tissue. If the fixative doesn't get to individual cells fast enough, cell death occurs. Hence, the thicker the tissue the greater the chance of autolysis in the deeper layers of tissue.
Poor fixation is often seen in weak staining of components especially nuclei and a lack of crispness of details. Here's an example of a nice stain of buccal (cheek) mucosa. See how easily we can make out the nuclei and the nuclear structures?

Not so the case with a badly fixed section. Everything is blurry and we can't even see individual cells, let alone nuclear membranes.

Another potentially embarrassing artifact is something we histologists like to call "shrinkage". During processing, soft tissue shrinks an average of 25-30%. This can be very noticeable at hard/soft tissue interfaces: as shown below. See all the white space between the bright pink bone and the more purple bone marrow within? That's a result of shrinkage.

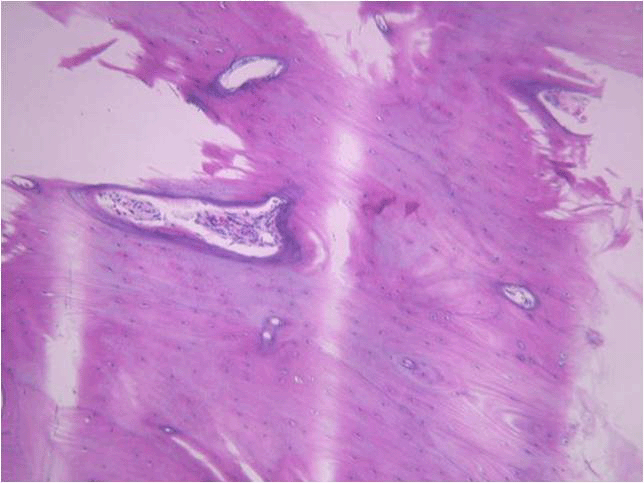
Problems with fixation are often accentuated in tissues such as compact bone where the mineral impedes penetration of the fixative. In such cases the soft tissue may show better preservation than the bone. Below is a nicely fixed section showing bone (the light purple stuff on the bottom). Arrows indicate osteocytes, or bone cells, sitting within their lacunae in the mineralized matrix.

Notice in the poor fixation slide that the lacunae in the bone towards the lower portion of the image are empty. Also, the bone structure itself looks a lot less uniform and “cracked”.

Sometimes, we demineralize bone or tooth to make it easier to section. The tissue is fixed, then the hard mineral is removed by treatment with dilute acid. Demineralization can cause similar effects to poor fixation if the tissue is left for too long a period of time. This can result in nucleic acid degradation with subsequent poor staining. On the other hand, if hard tissue is left for insufficient length of time in the demineralizing solution then there can be areas deep in the hard tissue that still retain mineral. These areas stain a deeper purple with hematoxylin as seen in the following image (this was probably a very difficult section to cut!)

Artifact can also occur during sectioning of the tissue. During sectioning a thin slice is cleaved from the surface of the block. The thinner the section the greater the chance of a sectioning artifact. You can experience this if you take a block of cheddar cheese and cut a slice. It is easy to cut the block of cheese in two, however the thinner the slice that you attempt the greater the chance of the slice fragmenting. Essentially, a tissue section is similar to a block of cheese mounted in a microtome. When the block initially contacts the knife there is a certain amount of vibration. This can result in what are known as “chatter marks” – alternating thick and thin areas in the section parallel to the direction of cut. As you might expect, it is easy to get chatter when sectioning hard tissues such as bone as shown below (direction of cut from the right hand side of the block).

Another way artifact may be created is during section mounting on the slide. We want the section to become completely flattened without any folds or areas that do not completely attach to surface of the slide. If the section does fold or pull away while it is being transferred to the slide, odd-looking structures can occur. Take the example shown in dentin staining of a tooth, below. That dark purple line isn’t a real structure, it’s just a fold in the section that picks up the purple hematoxylin stain. Sometimes folds in soft tissue can even be mistaken for structures such as blood vessels

Finally, areas raised from the slide surface may allow the stain to penetrate the section from both sides of the section and cause uneven staining. Here’s an example of this in a tooth section. The dark pink areas are places in the section that have lifted away from the slide surface and become stained by eosin on both sides of the tissue.

As you can see, there are many, many ways to goof up preparing and sectioning a histology slide. This may also explain why some of your sample slides are less than perfect. This definitely explains why your instructors get upset when good sample slides are broken. It takes time, practice, and talent to section and stain well!
In previous posts, we discussed how tissue is fixed and processed. During both of these procedures, things can go bad, leading to what we call staining "artifact".
The most common artifacts caused by goofs in fixation have to do with the speed of fixation vs. the thickness of the tissue. If the fixative doesn't get to individual cells fast enough, cell death occurs. Hence, the thicker the tissue the greater the chance of autolysis in the deeper layers of tissue.
Poor fixation is often seen in weak staining of components especially nuclei and a lack of crispness of details. Here's an example of a nice stain of buccal (cheek) mucosa. See how easily we can make out the nuclei and the nuclear structures?

Not so the case with a badly fixed section. Everything is blurry and we can't even see individual cells, let alone nuclear membranes.

Another potentially embarrassing artifact is something we histologists like to call "shrinkage". During processing, soft tissue shrinks an average of 25-30%. This can be very noticeable at hard/soft tissue interfaces: as shown below. See all the white space between the bright pink bone and the more purple bone marrow within? That's a result of shrinkage.

Problems with fixation are often accentuated in tissues such as compact bone where the mineral impedes penetration of the fixative. In such cases the soft tissue may show better preservation than the bone. Below is a nicely fixed section showing bone (the light purple stuff on the bottom). Arrows indicate osteocytes, or bone cells, sitting within their lacunae in the mineralized matrix.

Notice in the poor fixation slide that the lacunae in the bone towards the lower portion of the image are empty. Also, the bone structure itself looks a lot less uniform and “cracked”.

Sometimes, we demineralize bone or tooth to make it easier to section. The tissue is fixed, then the hard mineral is removed by treatment with dilute acid. Demineralization can cause similar effects to poor fixation if the tissue is left for too long a period of time. This can result in nucleic acid degradation with subsequent poor staining. On the other hand, if hard tissue is left for insufficient length of time in the demineralizing solution then there can be areas deep in the hard tissue that still retain mineral. These areas stain a deeper purple with hematoxylin as seen in the following image (this was probably a very difficult section to cut!)

Artifact can also occur during sectioning of the tissue. During sectioning a thin slice is cleaved from the surface of the block. The thinner the section the greater the chance of a sectioning artifact. You can experience this if you take a block of cheddar cheese and cut a slice. It is easy to cut the block of cheese in two, however the thinner the slice that you attempt the greater the chance of the slice fragmenting. Essentially, a tissue section is similar to a block of cheese mounted in a microtome. When the block initially contacts the knife there is a certain amount of vibration. This can result in what are known as “chatter marks” – alternating thick and thin areas in the section parallel to the direction of cut. As you might expect, it is easy to get chatter when sectioning hard tissues such as bone as shown below (direction of cut from the right hand side of the block).
Another way artifact may be created is during section mounting on the slide. We want the section to become completely flattened without any folds or areas that do not completely attach to surface of the slide. If the section does fold or pull away while it is being transferred to the slide, odd-looking structures can occur. Take the example shown in dentin staining of a tooth, below. That dark purple line isn’t a real structure, it’s just a fold in the section that picks up the purple hematoxylin stain. Sometimes folds in soft tissue can even be mistaken for structures such as blood vessels

Finally, areas raised from the slide surface may allow the stain to penetrate the section from both sides of the section and cause uneven staining. Here’s an example of this in a tooth section. The dark pink areas are places in the section that have lifted away from the slide surface and become stained by eosin on both sides of the tissue.

As you can see, there are many, many ways to goof up preparing and sectioning a histology slide. This may also explain why some of your sample slides are less than perfect. This definitely explains why your instructors get upset when good sample slides are broken. It takes time, practice, and talent to section and stain well!
Tuesday, August 17, 2010
Maybe we'll see this at the next summer Olympics?
I'd give it a 10.
Extra awesomeness points for the use of pool noodles as mitotic spindles.
Discover Simple, Private Sharing at Drop.io
Extra awesomeness points for the use of pool noodles as mitotic spindles.
Monday, August 9, 2010
It's the small things that matter
Today's topic is presented by Dr. Angel Paredes, also of the Department of Pathology and Laboratory Medicine.
For those dental students reading along, in class yesterday, Dr. Bick discussed transmission electron microscopy (TEM). Cell structures can be imaged using this technique to obtain magnifications of up to the maximum of 25,000,000X in some microscopes. Of course with this kind of power, these magnifications would be like looking at an elephant with a light microscope and that wouldn't make very much sense. Typically magnifications in the range of 2000x to 40,000x are useful for examining things like cells (eukaryotic and prokaryotic), viruses and protein complexes.
For tissue structure, specimens are stained with heavy metals (osmium tetroxide for lipids, Uranyl Acetate for proteins and lipids) and embedded in a resin. The resin is then sectioned thinly and mounted on a metal grid which is then stained again with Uranyl acetate and lead citrate. The grid is placed in the microscope where electrons are passed through the sample where the heavy metal stains interact with the beam giving the image its characteristic contrast.
The way this happens is that electrons hit a structure and change course (because of the heavy metal), some pass through with minimal interference (no heavy metal or just a little). A charged coupled device (CCD or digital camera) camera records the image by measuring the electron density at each pixel, thus creating a black and white EM image like we see in class. Electrons do not have color so images are black and white.
Since samples need to be sectioned for this technique, this doesn't really tell us much about the 3D structure of cells. For that analysis, we need to use a scanning electron microscope. Cells are coated with a very gold palladium in a sputter coater, and the electron beam is bounced off the surface. The resulting image shows only the cell surface.
Recently, however, advances in computing have allowed scientists to further develop electron cryomicroscopy, or cryoEM. This is a technique that is used to image very small biological specimens (< 1 micron) frozen and perfectly preserved in amorphous ice. NOT resin! Why is that important? The specimen that is imaged is perfectly preserved and, in the case of virus, the virus can later be removed from the microscope, thawed from the ice, and used to infect more cells - illustrating that the images recorded were indeed of infectious virus.
The process begins by applying 3-4 microliters of specimen (let's just say we're looking at a virus in this example) in buffer onto a 3 mm copper EM grid coated with a net-like layer of carbon holes. The virus is blotted with filter paper creating a thin layer of buffer in which the specimen is briefly suspended. The EM grid is then quickly plunged into a liquid ethane cup at liquid nitrogen temperature where the virus is flash frozen so quickly ice crystals cannot form and the specimen becomes embedded in a layer of glass-like ice. The virus is then placed into an electron microscope specifically designed to image these frozen specimens. Remember, this is TEM, so electrons are passing through the sample. We get a black and white picture that looks something like this:

These are alphaherpesvirus particles!
For the next step, it is important to understand that for homogenous particles such as viruses, all the particles embedded in the ice are in all possible orientations and can be considered different views of the same object. Using a computer, the digitized images from the microscope and image analysis software, the orientation of each particle is determined relative to the electron beam. Once all the orientations are determined, the computer merges all the different views into one 3D model which then represents the specimen. Because the specimen is reproduced in 3 dimensions, it can be dissected and studied by imaging software. Behold the modeled structure of Sindbis virus (an alphaherpesvirus):

A few words about resolution, from the expert:
"Ok. You would have to ask about resolution. Resolution in the world we live in means essentially the minimum distance that two small elements in an image (dots) are distinguishable as two independent elements or dots.
(Also remember from Dr. Bick's lecture that the distance (d) between points that can be resolved increases as the wavelength of light increases, i.e. the resolving power goes down.)
In cryoEM you relate everything to your pixel size and image size. The pixel is a measurement of a grey value of the specimen you scanned. The pixel size is dependent on the mag. The higher the mag, the smaller the pixel size when you image it with the digital camera on the microscope.
Ok, now you have pixel size and image size. Say you have a pixel size that is 2 angstroms/pixel. This means that the absolute best resolution you can get is 4 angstroms resolution because you cannot achieve a resolution that is equal to your scanning step size or pixel. The best you can do is twice the pixel size.
So, what does resolution mean? In cryoEM resolution is quantifiable. You have an image. The image has noise and you refine the data to achieve the best resolution and that is when the noise and signal equal each other and the ration is 1. You cannot get better than that. With the image and pixel size you know exactly at what resolution this occurs. For my newest virus image, I get to 13 ansgtroms resolution. That does not mean that I can see two dots no closer than 13 angstroms. In fact I can see detail that is smaller than 13 angstroms. The resolution in this case is a quantifiable measure of how far out I can signal from the data in terms of resolution with the maximum being 2 times the pixel size.
I know it's complicated but YOU ASKED."
Friday, July 23, 2010
When Neutrophils attack
Today in class the dental students learned about blood, and the cells contained within. I promised to post a cool video of a neutrophil "chasing" a bacteria, so here it is:
="">
Poor bacteria never stood a chance.
There are a lot of interesting processes going on here. The first, obviously, is that the neutrophil appears to "see" the bacteria. Since we all got a good look at cell structure last week, we know that cells don't have eyes! So just how does this neutrophil know to attack?
The neutrophil is most likely sensing chemical signals coming from the bacteria. So-called "quorum sensing signals" are basically messages to other bacteria to come and join the infection party. It is likely that our neutrophil has picked up on these quorum sensing molecules and is using them to sniff out the bacteria. In addition, we know that neutrophils, like other phagocytes, express what are called "Toll-like receptors",or TLRs, on their cell surface. These receptors, important for innate immunity, are designed to recognize bacteria-specific sugars and DNA sequences.
So the neutrophil has identified the target, the target is escaping - how does the neutrophil move? This involves a whole lot of specialized cell signaling. First, the neutrophil is exhibiting "chemotaxis", or movement along a chemical gradient. It wants to go where the chemical signal from the bacteria is most concentrated. So, receptors on the cell surface bind the bacterial proteins, then trigger changes in the cell.
One thing that's happening is that our neutrophil has developed polarity -now it has a front end and a back end. We're not quite sure how this happens, but it seems likely that the cell is probably sending out random pseudopodia in all directions. Whichever psuedopod gets positive reinforcement (e.g. lots of binding to bacterial protein receptors) gets to stay and grow, while the other pseudopodia which don't encounter their target are pulled back into the cell.
To move, the neutrophil needs to rearrange some cellular structures. This involves polymerization of actin and myosin, and probably some growth of microtubules as well.
Once the neutrophil catches up to the bacteria, the process of phagocytosis begins. The bacteria is "grabbed" by specific receptors and pulled into an endosome. That endosome will eventually fuse with a lysosome, and the resulting phagosome is where the bacteria ultimately meets its end.
Subscribe to:
Posts (Atom)